Rotted speaker foam surrounds: how to spot them and re-foam a vintage woofer
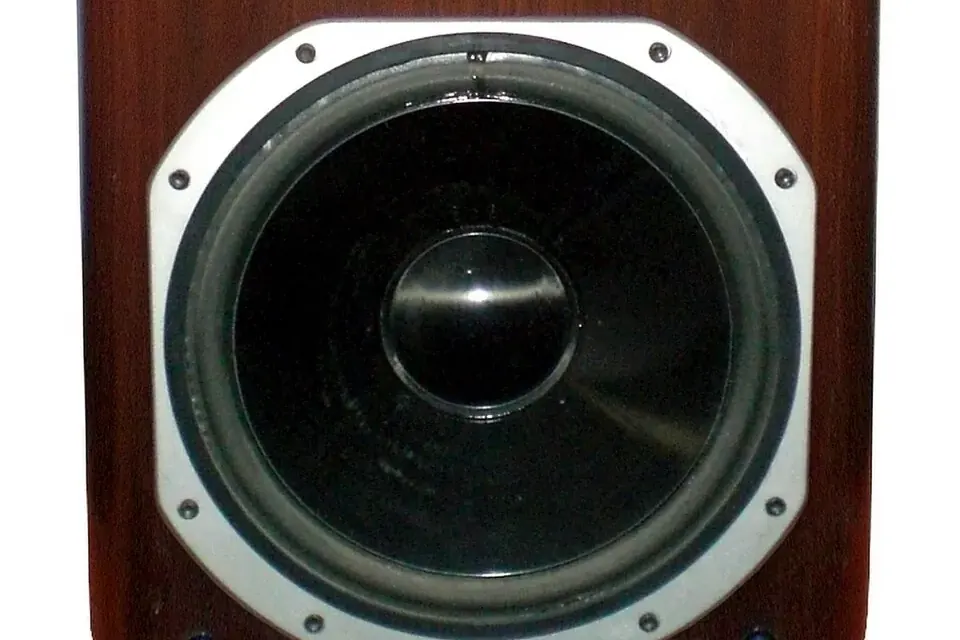
The woofer of a Yamaha NS-2000 from the early 1980s. Its surround is the dark ring between the cone and the silver frame, the part that most often fails on speakers of that era. Photo: Twy2008 and Pittigrilli, Wikimedia Commons, public domain.
Many vintage loudspeakers that turn up for very little at a house clearance have the same problem: the soft ring that holds the edge of the woofer cone has turned to crumbs. The cabinet, the crossover and the drive units themselves are often fine. Replacing that ring, a job usually called re-foaming, is one of the most rewarding repairs on the hobbyist's bench, provided it is done slowly and in the right order.
What a surround does
A cone driver has two flexible supports. At the back, the spider, a corrugated fabric disc, holds the voice coil centred in the narrow gap of the magnet. At the front, the surround joins the outer edge of the cone to the metal or plastic frame, called the basket. Together they let the cone move in and out like a piston while stopping it from tilting or drifting sideways. The surround also seals the front of the cone from the back, which matters a great deal in a sealed or ported cabinet.
Because it controls how freely the cone moves, the surround has an influence on the driver's resonance and its behaviour in the cabinet. That is why a replacement has to be close to the original in material, size and shape, not just "something that fits".
Foam, rubber or cloth?
- Polyurethane foam. Light and cheap, and widely used from the 1970s onwards. It is also the material that rots: over the years the foam hardens, cracks and finally disintegrates, whether or not the speaker has been played. Damp, heat and sunlight seem to hasten the process.
- Rubber. Butyl and similar rubbers age far more gracefully. A rubber surround may stiffen a little or get sticky, but it rarely falls apart.
- Treated cloth or paper. Many older drivers use an edge formed from the cone itself or a doped fabric ring. These can dry out or have their damping compound harden, but they do not crumble like foam.
Press gently on the surround with a fingertip, never on the cone. Foam that is healthy springs back. Foam that leaves a dent, feels crunchy, sheds black dust or shows splits near the cone is finished, even if the speaker still makes a sound. Playing it hard at that stage can let the cone wander far enough to damage the voice coil.
Before you start: is this driver worth it?
Push the cone in slowly and evenly with both hands spread on opposite sides, close to the edge. It should travel smoothly with no scraping. A grinding feel means the voice coil is rubbing and may already be damaged. Then measure the DC resistance across the terminals with a multimeter: an open circuit means a broken voice coil or lead-out wire, and re-foaming alone will not fix it. Check the cone for tears and the dust cap for dents. Small cone repairs are possible; a burnt or open coil means a re-cone, which is a different and more specialised job.
If you are still deciding whether to buy a pair with rotten foam, the checks in our guide to buying used vintage hi-fi apply: budget for the repair, and assume both speakers need it even if only one looks bad.
Getting the right replacement
Surrounds are sold by nominal driver size, but nominal sizes hide a lot of variation. Measure the old one, or what is left of it, before ordering:
- The outer diameter where it sits on the basket, and the width of the flat gluing flange.
- The inner diameter, where it meets the cone.
- Whether the inner edge was glued to the front or the back of the cone.
- The shape and height of the roll, and whether it rolled outwards or inwards.
For well-known drivers, specialist suppliers often sell surrounds matched to the original part number. Search by the manufacturer's code printed on the magnet or basket rather than by the speaker model. Our article on tracking down rare components covers how to search by part number. Buy a kit for the pair, and use the adhesive supplied or recommended with it: surround adhesives are chosen to stay flexible and to bond to both foam and cone.
Removing the old foam
Take the driver out of the cabinet, noting which wire goes to which terminal. Lay it face up on a clean, soft surface, and keep it away from steel tools and screws: the magnet will pick them up and fine metal filings in the gap are a serious problem. Masking tape over the front of the gap, if the dust cap is off, is a sensible precaution.
Pull away the loose foam, then lift the gasket ring on the basket if there is one; it is often held with the same glue and may need gentle prying with a thin blade. Clean the old foam and glue off the cone edge and the basket flange with a blunt tool, a soft brush and patience. Paper cones are easily torn and solvents can soften them, so scrape rather than soak, and test any cleaner on a hidden spot first.
Centring the voice coil
This is the step that decides whether the repair works. With the old surround gone, only the spider is holding the cone, and the voice coil must stay perfectly centred in the magnetic gap while the new glue sets. There are two common approaches.
- Shims. The dust cap is carefully removed, and thin plastic shims are slid into the gap around the coil to hold it centred. The cap is then replaced with a new one once the surround is dry. This is the most reliable method, but it means cutting the cap off neatly and finding a matching replacement.
- Signal method. The dust cap stays on. A low-frequency tone at very low level is fed to the driver while you position the cone, and you listen and feel for the point where it moves freely without rubbing. It needs a signal generator or a test track and a quiet room, and more patience.
Gluing in the new surround
- Dry fit first. Check that the surround sits on the cone and the basket flange without stretching or wrinkling.
- Glue the inner edge to the cone with a thin, even bead. Let it set as the kit instructions say, with the coil held centred.
- Glue the outer edge to the basket. Work around in small sections, pressing the flange down while checking from time to time that the cone still moves freely. Uneven tension here pulls the cone off-centre.
- Refit the gasket so that the driver seals against the baffle when it goes back into the cabinet.
- Leave it to cure for the full time recommended before removing shims or playing music.
Testing and refitting
Once the glue has cured, push the cone in gently again: it should move as smoothly as a good driver. Play a low sine sweep, say from bass upwards, at modest level and listen close to the cone for scraping or buzzing. A rub that appears only at certain frequencies or levels usually means the coil is slightly off-centre, and it is better to discover this now than after the driver is back in the box.
Re-foam both speakers of a pair, and compare them side by side at low volume before a long listening session. Then check the rest of the system: an amplifier that has sat unused as long as the speakers may need its own attention, as our guide to what fails in vintage hi-fi explains.
When to hand it over
Drivers with a scraping coil, an open circuit, a badly torn cone or a passive radiator that has to match its partner closely are better sent to a specialist who can re-cone or measure them. And if a pair of speakers is going to need several such repairs, compare the total with the cost of another good secondhand pair; our page on building a system on a tiny budget has suggestions.
Sources
- Loudspeaker construction, the roles of the surround and spider: Wikipedia, "Loudspeaker", section on driver design.
- Driver parameters and the effect of suspension compliance on bass response: Wikipedia, "Thiele/Small parameters".
- Service manuals and replacement-part instructions from the driver manufacturers and surround-kit suppliers concerned (sizes, adhesive and curing times).
 On the bench
What fails in vintage hi-fi
Capacitors, pots, relays, belts and bias, and why safety comes before any of them.
Buying used vintage hi-fi
Research the model, test what you can, budget for service, and know when to walk away.
Good hi-fi on a tiny budget
Speakers first, secondhand amplifiers, free gains from placement, and nothing spent on magic cables.